Moules Marinieres or Mussels in a Wine Sauce


FullSizeRender 2

Please forgive my very long absence. This has been an eventful spring and summer for me. Loss of my father-in-law, school letting out, my son graduating, then going on to college ( he went to a summer camp to get ready for what awaits him in the fall at the military academy that he will be going to.), and then vacation started…with the usual in and out of the house.

If you have not seen much recipes, this would be explained by two reasons. One because I had to place myself and my son on a diet to help him trim down the necessary pounds that he needed to lose to fit the requirement of his school.

And two because I have not been cooking as much, preferring eating carpaccio, ceviche and salads rather than cooked meals… though maybe I should have shared those?!?!

After a couple of weeks of training in Charleston, my son finally came yesterday for the week-end. And though he did not complain about the food, in fact called it “pretty good”, I wanted to cook something that he really like: Mussels.

My most favorite ones are the one cooked in curry and coconut milk- I  love Asian food so much and  all those exotic flavors that Curry Mussels count as one of my favorite.

But he wanted the traditional ones, so this is what I will share with you today. I may have already posted a recipe, but this one is slightly different.

Now, I do not know where you will be buying your mussels. I bought mine at Costco, because I do not live closed to the ocean, and Costco offer the best there. But shop the stores in your area, you may have better options.

Before cooking your mussels, you will have to do two things.

  1. rinse your mussels under running water and scrub them a but with a sponge or even a nail brush to remove the dirt, or the algue.
  2. discard any mussels that are wide opened. If they are slightly opened, touch the inside with a knife to see if they are alive. If the shell closes, then they are alive and good to eat. If they are not, then toss it in the trash.

Once you have done those two steps, you are ready to cook them. Now be careful, it only takes a few minutes to cook mussels ( 5-8 minutes at the very very most), so be sure that all your sides are ready before you start.

Generally, mussels are accompanied by French fries or pommes frites, but sautéed potatoes would be good as well. A Boston salad would be a great addition also to both.

Here we go…

IMG_7254

Ingredients:

  • 2 lbs of Mussels
  • 1 onion sliced thinly,
  • 2 garlic cloves,
  • 1/4 cup of fresh parsley,
  • 4 tbsp of butter,
  • 1 cup of white wine,
  • 1 lemon,
  • 1 tbsp of flour,
  • salt and pepper to taste,
  • 1/2 cup of heavy cream.

IMG_7258

  1. Clean up the onion and cut it in half. You can slice and dice the onion ver thinly with the knife, but these days I like to use my special tool from Demarle. It really chops my onion really fast, and I do not tear up.
  2. In a large saucepan, melt butter and saute the garlic, then add the onion.
  3. Add the mussels and stir until they start to open up. Cover for a few minutes, and cook the mussels until they open up. Stir repeatedly so as to make sure that all mussels open up.
  4. Then add the wine, salt, pepper,  1/8 cup of the fresh parsley, and bring to boil. Stir as well. Turn the heat down and set aside.
  5. Meanwhile, in another saucepan, melt 2 tbsp of butter, add flour and make a roux ( cook until the flour turns golden), add 2 cups of the mussel liquid, stir and cook for 2 minutes until it thickens.
  6. Then add the cream and continue stirring. Pour it all over the mussels and stir.
  7. Sprinkle the parsley over the mussels.
  8. Serve the mussels in soup bowls, and accompany them with Pommes-frites, and whatever else you wish to serve. If you wish to serve wine, a nice Riesling or a Golden Ale Beer is a great addition. Et voila. Enjoy!!!

IMG_7256

My Theodor was happy. So much so that he ate two large bowls . preferring to eat his mussels over his fries. I would say that that this dinner was a win;-))))

Bon Appetit and Happy Cooking!!!

Mussels in Parsley, Onion and Wine Sauce, or Moules Marinières

  • Servings: 4-6
  • Difficulty: Super Easy
  • Print

FullSizeRender 2

Ingredients:

  • 2 lbs of Mussels
  • 1 onion sliced thinly,
  • 2 garlic cloves,
  • 1/4 cup of fresh parsley,
  • 4 tbsp of butter,
  • 1 cup of white wine,
  • 1 lemon,
  • 1 tbsp of flour,
  • salt and pepper to taste,
  • 1/2 cup of heavy cream.
  1. Clean up the onion and cut it in half.
  2. You can slice and dice the onion ver thinly with the knife, but these days I like to use my special tool from Demarle. It really chops my onion really fast, and I do not tear up.
  3. In a large saucepan, melt butter and saute the garlic, then add the onion.
  4. Add the mussels and stir until they start to open up. Cover for a few minutes, and cook the mussels until they open up. Stir repeatedly so as to make sure that all mussels open up.
  5. Then add the wine, salt, pepper, 1/8 cup of the fresh parsley, and bring to boil. Stir as well. Turn the heat down and set aside.
  6. Meanwhile, in another saucepan, melt 2 tbsp of butter, add flour and make a roux ( cook until the flour turns golden), add 2 cups of the mussel liquid, stir and cook for 2 minutes until it thickens.
  7. Then add the cream and continue stirring. Pour it all over the mussels and stir.
  8. Sprinkle the parsley over the mussels.
  9. Serve the mussels in soup bowls, and accompany them with Pommes-frites, and whatever else you wish to serve. If you wish to serve wine, a nice Riesling or a Golden Ale Beer is a great addition. Et voila. Enjoy!!!

Bon Appetit and Happy Cooking!!!

March 21st is Macaron Day!!!


IMG_9605

Did you know that today is National Macaron Day. For those of you who do not know what a Macaron is, Macaron is a scrumptious delicious bitesize dessert originally from France. Those sweet desserts   are made with egg whites, icing sugar, granulated sugar and ground almond. It is usually filled with buttercream, jam, or flavored ganache.

IMG_9606

It is hard to describe a macaron. People often  want to compare them to meringues because they are light like meringues, and a bit fluffy like them also, but that would not give them justice!!!

Macarons  are like heaven in your mouth. Those cloud like cookies will take you by surprise.  Because of their crunchy shell, you will not expect their smooth and soft, delicate filling inside that will melt  in your mouth  releasing their delicate flavors.

A very re-known Chef by the name of François Payard once described his sensation when eating one:” the many different flavors textures and flavors will hit you all at once”.

photo11

Have you had yours today??? If you have not, it is probably too late, though it depends where you live. But if you live in my corner of the world, you are probably out of luck.

But,  Easter is coming soon, so you can always order some for a special someone. They make for great gifts, and they are very impressive!!!

And they will,  always always please your crowd!!!

Not really sure what to bring your mom, or grandmother for Easter. Don’t just settle for chocolate eggs, bought from the local grocery store. Get them something that has personality, get them something that is  fabulous like those Parisian Macarons. They are yummy, delicious, you will not regret it. Plus they are gluten free.

Let me know if you wish to order some. ( Minimum Order is a dozen per flavor).

Special Easter Flavors

Box of 12 :$15(2 macarons of each flavor) or

Box of 24 : $27 ( 4 macarons of each flavors)

Strawberry

Vanilla

Pistachio

Blueberry

Lemon

Apricot

Strawberry

IMG_9606

The usual Flavors are as followed:

chocolate
coffee
vanilla
choco/ mint
raspberry
strawberry
almond
lemon
lime
orange
anis/ licorice
black berry
lavender
rose
green tea
hazelnut
pistachio
mandarin
grapefruit
coconut
peppermint
peanut butter
maple syrup
dulce de leche


photo6-e1397614372151

Please place your order 48 hours in advance as Macarons are best eaten fresh, and they will need to be made the day prior of the delivery. Thank you! ( Price upon request).

Call to order at 864-494-4494.

Lady Fingers or Biscuits Cuilleres


IMG_0328

When you live in Europe or France, and you need an ingredient for a recipe, you can go to any supermarket and just get it because they would have the item that the recipe demands. Unfortunately, most American supermarkets does not carry all the ingredients that i was accustomed to work with, or play with in Europe which can make your cooking experience a bit of a challenge or a scavenger hunt. Over the years that I have been in the USA, I have learned to either bring those coveted items back with me, or find internet sites that either sell them, or explain how I can make them myself.

So this is how, I learned to make pistachio paste, Pralin, Chestnut Puree.

This weekend I wanted to make a Buche de Noel ( Yule Log) and the recipe called for Boudoirs, or Lady Fingers… But I could not find them in any store so I had to make them.

So here is the recipe. It is one of the easiest thing to make, it is fast and you make lots of cookies at once that keep really well in an airtight container.

Ingredients for about 50 individual cookies:

  • 3 eggs separated
  • 63 grams of sugar
  • 1 tsp of vanilla extract ( I am using the vanilla bean Paste from Nielsen Massey found at the Fresh Market)
  • 32 gr. of flour
  • 32 gr. of corn starch or even potato starch
  • powdered sugar
  1. Separate the eggs and place the egg whites into a mixer. Beat the egg whites into hard peaks.
  2. When you have reached this texture, add the egg yolks and blend them in.
  3. Then sift the corn starch and the flour and add it gently to the egg whites.
  4. Add 1 tsp of vanilla extract.
  5. Fill a pastry bag and draw small sticks of about 1/2 inch by 2 inches on  large silpat that you would have placed on a large perforated sheet.
  6. Dust some powdered sugar all over the “cookies”.
  7. Bake the cookies in the oven for 12 minutes  at 338 or until they become a very pale yellow.
  8. Remove them from the oven and let them cool down at room temperature. Keep in an airtight container so that they will stay hard ( can keep for several weeks).

And with those wonderful cookies, I was able to make my Vanilla and Chocolate Buche de Noel. Yum….

IMG_0315

Bon Appetit and Happy Cooking!!!

Lady Fingers or Biscuits Cuilleres

  • Servings: 12-16
  • Difficulty: Very Easy
  • Print

IMG_0328

Ingredients for about 50 individual cookies:

  • 3 eggs separated
  • 63 grams of sugar
  • 1 tsp of vanilla extract ( i am using the vanilla bean)
  • 32 gr. of flour
  • 32 gr. of corn starch or even potato starch
  • powdered sugar
  1. Separate the eggs and place the egg whites into a mixer. Beat the egg whites into hard peaks.
  2. When you have reached this texture, add the egg yolks and blend them in.
  3. Then sift the corn starch and the flour and add it gently to the egg whites.
  4. Add 1 tsp of vanilla extract.
  5. Fill a pastry bag, and draw small sticks of about 1/2 inch by 2 inches on large perforated sheet that you would have placed on a large perforated sheet.
  6. Dust some powdered sugar all over the “cookies”.
  7. Bake the cookies in the oven for 12 minutes at 338 or until they become a very pale yellow.
  8. Remove them from the oven and let them cool down at room temperature. Keep in a airtight container so that they will stay hard ( can keep for several weeks).

Bon Appetit and Happy Cooking!!!

Please share this post if you like it and post your comments. Merci Beaucoup!!!

Guimauve a la Banane or Banana Flavored Marshmallow


photo 3

It is funny how life changes you. Ten years ago my house needed to be impeccable for me to be happy. The house needed to be clean, and in order everywhere. Every bibelot, every paper needed to be in its place. Not a spec of dust were to be seen. Even my children toys needed to be put away after being played. And then we moved. We moved to a bigger house, not a fancy house like the previous one, but a good home. The home we chose, is one that we really live in. It is spacious and roomy and it has plenty of doors for me to shut if I don’t want to see the mess behind it. It is a home I don’t feel stressed if it is not straightened all the time. It is a house I feel comfortable getting in and out with wet feet if I want to. It is a house I can cook in without reservation. It is my home;-)

When my children were smaller, I never really let them cook with me because I was concerned about the mess they were going to make. Today  i love to have people over to cook with. It does not matter if we are going to make a mess, and if the floor is going to be covered with flour. We will have fun.. we will make memories… and then I will clean it up and it will look all good again;-)

I hope that you will too.

Today I hosted a cooking class for several beautiful young ladies and we had much fun. Yes there was a gigantic mess all around when we were done. Yes, there were tons of dishes to be done and lots of sugar and flour on the floor, but we made some great recipes and  they enjoyed learning and tasting. We made Baked Brie with Pepper Jelly, Teriyaki Chicken, Boursin Potato Cupcakes, Broccoli Souffle, Strawberry Tart and Marshmallows;-) Yum.

I will share the recipe of Marshmallow. It is fairly easy to make, very inexpensive, quite fast I think.. and it is really yummy. I adapted the recipe from Mercotte.

Ingredients for about 4 dozens of marshmallows or guimauves:

  • 250 gr. of sugar
  • 80 ml of water or 80 gr. of water
  • 12 gr. or two packs of gelatin in powder
  • 3 tbsp of water to mix with the gelatin.
  • 90 gr. of egg whites at room temperature
  • 2 drops of lemon juice
  • 1 pinch of salt
  • 1/8 tsp of banana extract or more if you want a stronger taste
  • a few drops of yellow coloring ( optional)
  • 50 gr. of powdered sugar
  • 40 gr. of corn starch
    1. In a large bowl, mix the corn starch and the powdered sugar.
    2. Lay a large roul’pat on your kitchen counter and dust the roul’pat with this mixture of sugar and corn starch. Place the rectangular frame on top of the roul’pat. Set aside for later usage.
    3. In a small container, mix the gelatin with 3 p of water. Let it rest.
    4. In a small saucepan, cook the water and the sugar and bring it to boil. Cook the syrup until you have large bubbles and the sugar is starting to turn a bit yellow. ( On the thermometer, it should come up to 130 c. )
    5. While the syrup is coming to temperature, place the egg whites, lemon drops and salt in a large bowl and beat it until you are getting  beaten egg whites with soft peaks.
    6. When the syrup has come to 130 c in temperature, start pouring it slowly in the egg whites, on the side of the mixer while still beating the egg whites. Add the coloring and the banana extract and beat it in.
    7. Place the gelatin in the microwave and cook it for 15 sec. Pour the melted gelatin into the egg mixture and beat well.
    8. Turn the mixer to high, and beat the egg whites until they are completely cold.photo 2
    9. With a spatula, put a bit of the marshmallow mixture into a pastry bag and make fun shapes with the paste on the roul’pat. We made some zigzag, some bows, some hearts, some knots. photo 3
    10. With the rest of the paste, pour it inside the frame making a rectangle of about 8×5 and about 1 inch width.photo 4
    11. Dust more corn/flour mixture on the marshmallows and let them rest for about 2 hours.photo 1
    12. When the marshmallows have rested, you can take a large knife and cut square of marshmallows.photo 5
    13. Keep them in a sealed container for a week. Miam, Miam…photo 3


Bon Appetit and Happy Cooking!!!

Guimauve a la banane, or Banana Flavored marshmallows

  • Difficulty: moderate
  • Print

photo 1

Ingredients for about 4 dozens of marshmallows or guimauves:

  • 250 gr. of sugar
  • 80 ml of water or 80 gr. of water
  • 12 gr. or two packs of gelatin in powder
  • 3 tbsp of water to mix with the gelatin.
  • 90 gr. of egg whites at room temperature
  • 2 drops of lemon juice
  • 1 pinch of salt
  • 1/8 tsp of banana extract or more if you want a stronger taste
  • a few drops of yellow coloring ( optional)
  • 50 gr. of powdered sugar
  • 40 gr. of corn starch
  1. In a large bowl, mix the corn starch and the powdered sugar.
  2. Lay a large roul’pat on your kitchen counter and dust the roul’pat with this mixture of sugar and corn starch. Place the rectangular frame on top of the roul’pat. Set aside for later usage.
  3. In a small container, mix the gelatin with 3 tbsp of water. Let it rest.
    In a small saucepan, cook the water and the sugar and bring it to boil.
  4. Cook the syrup until you have large bubbles and the sugar is starting to turn a bit yellow. ( On the thermometer, it should come up to 130 c. )
  5. While the syrup is coming to temperature, place the egg whites, lemon drops and salt in a large bowl and beat it until you are getting beaten egg whites with soft peaks.
  6. When the syrup has come to 130 c in temperature, start pouring it slowly in the egg whites, on the side of the mixer while still beating the egg whites.
  7. Add the coloring and the banana extract and beat it in.
  8. Place the gelatin in the microwave and cook it for 15 sec. Pour the melted gelatin into the egg mixture and beat well.
  9. Turn the mixer to high, and beat the egg whites until they are completely cold.
  10. With a spatula, put a bit of the marshmallow mixture into a pastry bag and make fun shapes with the paste on the roul’pat. We made some zigzag, some bows, some hearts, some knots.
  11. With the rest of the paste, pour it inside the frame making a rectangle of about 8×5 and about 1 inch width.
  12. Dust more corn/flour mixture on the marshmallows and let them rest for about 2 hours.
  13. When the marshmallows have rested, you can take a large knife and cut square of marshmallows.
  14. Keep them in a sealed container for a week. Miam, Miam…

Bon Appetit and Happy Cooking!!!

Raspberry and Rose Napoleon


photo 5

I love living here in the States. I love the weather, the people, the opportunity, everything.

If there is something that I miss, though, it is my family. Luckily as a teacher I have my summer off which gives me the time and opportunity to travel. So every year for the past 10 years, Lisa, Theo and myself ( or les Trois Mousquetaires, as we like to call each others) we travel, visit family and sightsee France and Europe.

This year it was the surrounding of Paris with all its beautiful cattles: Fountainebleau, Chantilly, VilleComte…
photoand Berlin. photoIf our trip is different every year, there is one thing  that stays constant, it is our usual lunch at La duree. We have made it our yearly treat. we love to go there because the setting is beautiful, the food is wonderful and it is just fun to be there;-). Plus the desserts over there are always out of this world!!!

I am sure that you can already guess what i order each time?!? Yes, it is chocolate, of course. My dessert this year looked like this… pretty?! right;-)photo

Theo ordered a very fancy ice-cream, and lisa ordered a rose and raspberry napoleon.

I did not say a word when she ordered that dessert because i did not want to dissuade her from her choice, but I did not think that she would like the rose flavor since she does not like my rose macaron. But to my surprise, she loved it, loved it.

Well this Sunday, for our dessert treat I decided to make that for our dessert. I somewhat followed the recipe that Stephane Glacier propose in his book Tartes, Gouters, et Entremets, but I changed a few things to make it easier. 

This dessert looks very hard to make, BUT IT IS NOT so I hope that you will give it a try. It is worth it. Yes!!!

Proof??? my daughter asked I made two so that she would not have to share hers;-)

photo 3

Ingredients for a square for 4 people:

  • 1 puff pastry package thawed at room temperature for 40 minutes.
  • 1 box of raspberry box of about 6 oz. 
  • 1/4 cup of granulated sugar for the puff pastries.

Ingredients for the Creme Patissiere, or Pastry cream:

  • 250 gr. or 1 1/4 cup of whole milk,
  • 3 egg yolks,
  • 40 gr. or 3 tbsp of granulated sugar,
  • 10 gr. or 3 tsp. of flour,
  • 10 gr. or 3 tsp. of corn flour,
  • a pinch of salt,
  • 1 stick of butter.
  • 1 tsp of vanilla extract
  • 1/2 tsp of rose extract.
  1. Place the puff pastry sheet on the roulpat and with a rolling-pin, spread the dough out to make a rectangle of 13″ by 9.5″.
  2. Place the pastry onto a silpat that you would have previously placed on a perforated sheet. With a fork, prick the pastry. photo 2
  3.  Place another silpat on top, and place it in the fridge. Let it rest for at least 30 minutes to an hour.
  4. Turn the oven to 356.
  5. Remove the pastry from the fridge. When the oven is at temperature, place another perforated sheet above the silpat to prevent the dough from rising when it will cook in the oven.
  6. Bake the puff pastry for 30 minutes. It should be golden.photo 3
  7. Remove the puff pastry from the oven.
  8. Turn the oven to 450.
  9. Sprinkle some sugar all over the baked pastries and when the oven is at 450, place the pastry back into the oven for 6-7 minutes or until the sugar has completely melted and has become caramel. Be careful to watch that the sugar is not burning. photo 2
  10. While the puff pastry is cooking, prepare the mousseline cream.
  11. In a small saucepan warm up the milk and bring the mixture to boil.
  12. Meanwhile, in large bowl, beat the egg yolks with the sugar until the mixture becomes whitish.
  13. Add the flour and the corn starch to the eggs and mix.
  14. Pour the hot milk into the egg mixture and stir.
  15. Place the milk/ egg mixture back onto the stove and cook until the mixture is bubbling and is becoming really thick. Remove the pastry cream from the stove, place it into a bowl, add the vanilla and stir well.
  16. Cover it tightly with a plastic wrap and let it cool.
  17. When the cream is completly cool, place it in kitchen mixer. Add the soft butter and whip until the mixture is fluffy. Add the 1/2 tsp of rose extract. Set aside.
  18. Remove the pastry from the oven, and let it cool completly.
  19. Let the puff pastries cool completely before assembling the dessert.
  20. With a sharp knife, cut each pastry into 2 rectangles of 9″ by 6″.photo 3
  21. Place one rectangle on a plate, and place rasberries all around the rectangle. Pipe the cream inside the rectangle of raspberry. photo 2Place a few more rasberry in the middle of the rectangle to create leverage for the top tier of the cake.
  22. Top the cream with another rectangle of cooked pastry.photo 5
  23. With the piping bag and the small round tip, pipe the cream all over the second rectangle.  photo 1
  24. Place another rectangle atop the cream.
  25. Cut a waxed paper, or aluminium a bit smaller than the top rectangle.photo 2
  26. Lay it on the top puff pastry, and with a  powdered sugar sifter, sprinkle some sugar for decoration. Add a few fruits et voila!!!photo 3photo 4photo 5

Bon Appetit and Happy Cooking!!!

Steamed Potatoes with Melted Brie and Caramelized Onion


photo

I don’t want make any generalization about German men, but based on my experience and on my acquaintances, it seems that they like, should I say, love potatoes. And if you ask them what they would like to eat, it will be most likely potato. Is it a curse or a blessing?!?! I think that most women would welcome this fact because this make cooking dinner easy. Me… it makes cooking twice as hard as I don’t care for potatoes and rather eat vegetables ( no, potatoes does not really belong to the family of vegetable contrary to what husband wants me to think;-)

So while I was getting my dinner ready ( lobster with cream of corn), I also had to think what i was going to fix for him and the rest of my family. It was going to be easy: brats and potatoes.

Today I wanted to add variety to his vegetable of choice and this is what I came up with: Steamed Potatoes with Melted Brie and Caramelized Onions)

Ingredients for 3-4:

  • 6 medium-sized potatoes
  • 1 brie
  • 1 onion
  • 1 tbsp of olive oil
  1. Peel the potatoes and cut them in 1 inch cubes. Rinse the potatoes well under running water and steam them as you would normally. I am choosing to steam them with Demarleathome cookware as it allows me to steam most vegetables in very little time. I place them into the large round mold. Add a pinch of salt. Place the octogonal silpat on top of the large round and cook the potatoes for  6-8 minutes. IF THE MOLD IS FULL TO THE TOP, COOK THEM FOR 8 MINUTES. IF IT IS LESS, 6 MINUTES IF ENOUGH.
  2. Meanwhile, prepare the caramelized onions. Drop 1 tbsp of olive oil in a large saute pan, and warm it up. When the oil is hot, add the sliced onion and cook over medium high until the onions are becoming a nice dark golden color. Set  aside.
  3. Remove the brie from its paper, place it on a plate and cook in the microwave for 2 minutes.photo
  4. Divide the potatoes equally among each plate and drizzle the melted brie over the potatoes. Sprinkle some of the caramelized onions and enjoy!

Bon Appetit and Happy Cooking!!!

If you like this recipe, I would love for you to subscribe to this blog by entering your e-mail address into the box on the right of this post. Also if you have time, please rate or post a comment. Your comments are always much appreciated. Thank you ;-)

Easy Baguette A l’Ancienne


photo 2

There is baguette, and baguette. I don’t want to offend anyone here, but it is difficult to find great baguettes here in the US. Not everything that is long, brown and narrow is a baguette.

In fact did you know that a baguette is defined by French law? A standard baguette has a diameter of about 5 or 6 centimetres (2 or 2⅓ in) and a usual length of about 65 centimetres (26 in), although a baguette can be up to a metre (40 in) long.

So if  it is smaller or larger in size, it will carry a different name. For example, a short, almost rugby ball shaped loaf is a bâtard (literally, bastard), another tubular shaped loaf is known as a flûte. A thinner loaf is called a ficelle(string). A short baguette is sometimes known as a baton (stick).

The word “baguette” was not used to refer to a type of bread until apparently 1920,but what is now known as a baguette may have existed well before that. The word simply means “wand” or “baton”, as in baguette magique (magic wand), baguettes chinoises (chopsticks), or baguette de direction (conductor’s baton).

photo 5

Though the baguette today is often considered one of the symbols of French culture viewed from abroad, the association of France with long loaves predates any mention of it. Long, if wide, loaves had been made since the time of Louis XIV, long thin ones since the mid-eighteenth century and by the nineteenth century some were far longer than the baguette.

It seems however that right baguette appeared with the introduction of  deck ovens, or steam ovens. Deck/steam ovens are a combination of a gas-fired traditional oven and a brick oven, a thick “deck” of stone or firebrick heated by natural gas instead of wood. The first steam oven was brought (in the early nineteenth century) to Paris by the Austrian officer August Zang, who also introduced the pain viennois (and the croissant) and whom some French sources thus credit with originating the baguette. Wikipedia

Deck ovens use steam injection, through various methods, to create the proper baguette. The oven is typically heated to well over 205 °C (400 °F). The steam allows the crust to expand before setting, thus creating a lighter, airier loaf. It also melts the dextrose on the bread’s surface, giving a slightly glazed effect. Wikipedia

An unsourced article in The Economist states that in October 1920 a law prevented bakers from working before 4 a.m., making it impossible to make the traditional, round loaf in time for customers’ breakfasts. The slender baguette, the article claims, solved the problem, because it could be prepared and baked much more rapidly, though France had already had long thin breads for over a century at that point. Wikipedia

The law in question appears to be one from March 1919, though some say it took effect in October 1920:

It is forbidden to employ workers at bread and pastry making between ten in the evening and four in the morning.[7]

The rest of the account remains to be verified, but the use of the word for a long thin bread does appear to be a twentieth century innovation.Wikipedia

French bread is required by law to avoid preservatives, and as a result bread goes stale in under 24 hours, thus baking baguettes is a daily occurrence. The “baguette de tradition française” is made from wheat flour, water, yeast, and common salt. It does not contain additives, but it may contain broad bean flour (max 2%), soya flour(max 0.5%), wheat malt flour (max 0.3%)”. Wikipedia

To me a baguette has to smell like one, taste like one, and it should have texture. Most baguettes found in the States are made industrially and therefore lack taste and texture. I don’t know if you have a baker in your hometown, but it is difficult to find a good baguette if there is not a baker around.  The closest that I know lives several dozens miles away.  So if you are in my case, you have two solutions: go to France and enjoy what is there ( hard and expensive but worth it;-), or try to fix your own at home. It is fairly easy to do and you do not need a bread machine.

Did you know that there are millions of baguette recipes? Even in France, when you go to a boulangerie you have a variety to choose from: Baguette Viennoise ( mix between baguette and brioche- my favourite for breakfast, Banette, Baguette traditionelle.

My sister is a baker by trade and I thought I would try some of her recipes. This baguette is what you would call baguette a l’ancienne.

Ingredients for 4 baguettes:

  • 6 1/2 cup of flour ( all-purpose bleached or unbleached)
  • 1 1/2 tbsp of active yeast
  • 1  tbsp of salt
  • 3 cup of warm water. 
  • more flour to sprinkle
  • about 4 cups of water to create moisture in the oven
  1. In a large bowl, pour the flour, the salt and the active yeast and mix well.
  2. Add the water and with a spoon or your hands, knead the dough. The dough should be sticky.photo 5
  3. Then knead the dough again by folding it on itself. Do this step 40 times.photo 2
  4. Place the dough into a large bowl. Cover the bowl with a plastic wrap and place the bowl in a warm place in your kitchen. You may use your warming drawer if you have one for 2 hours, or until the dough doubles in size.photo 3
  5. Take the dough out of the bowl. Place on the roul’pat and divide the dough in 4.
  6. Flatten the dough flat.photo 4
  7. Then fold it over itself and roll it out so that it makes a thin cylinder.photo 1
  8. Place the dough onto the baguette silform that you would have placed onto a perforated sheet, and with a sharp razor blade, make indentations into the baguette every 2-3 inches.photo 2
  9. Cover the dough with a plastic film and let it rise again for 40 minutes.
  10. Turn the oven at 450.
  11. Place a metal sheet pan at the bottom of the oven and pour in 2 cup of water to create moisture and steam since our oven does not have steam on it.
  12.  When the oven has reached the temperature, throw about 2 cups of water into the metal pan again.
  13. Throw some flour over the bread, and place the bread tray into the oven and cook the bread for 20-25 minutes or until it is golden.photo 1
  14. Enjoy while it is warm or the following day. It will still taste great. photo 5photo 4

So what did I think of this bread?? Well it really brought me back home for a minute. It tasted much like those Baguette a L’ancienne that I love. The bread was crispy and the inside fluffy. It was not light  and airy like a Parisian baguette, but it was exactly like those Baguette a l’ancienne. It smelled very good as well. It smelled like a baguette, or a bread, not like yeast.

Conclusion: A winner. My husband even suggested that i sell them to the local restaurants. What a compliment;-)

I hope that you will give it a try.

Bon Appetit and Happy Cooking!!!

Baked Brie the Simple Way


photo 5

This past Saturday I had a  very busy plate: Cooking class at 10 for 12 young ladies and a small order of appetizers for that same afternoon. I could have cooked dinner, but i chose to go for a long run and to play in my kitchen so when it was time for dinner there was nothing to offer. I will tell you that I really was not in the mood to make dinner because I knew that what I wanted to cook would not please my husband, and what he wanted was not going to please me. So what to do??? I did not want to go out for dinner and we did not want to take out. As i opened my fridge for inspiration, i saw two small brie that Lisa had purchased for the cooking class.

My family loves baked Brie and especially Garlic Baked Brie. They were introduced to this yummy appetizer in France and I thought that tonite this easy appetizer would make for a fun dinner option.  Easy, simple, Yummy. ….Yeah i know, not to healthy but it was Saturday night so who cares…

photo 2

Ingredients for 2-4:

  • 2 individual sized brie from President
  • 8 garlic cloves peeled and sliced in half
  • 2 baguette uncooked from the freezer section of the grocery store or from Costco.
  1. Turn the oven to 400.
  2. Remove the brie from its box and its wrapping.
  3. Place the brie on a cutting board.
  4. With a sharp knife, make 8 cuts on the top of the brie all around.photo 1
  5. Place a half  of a garlic in each slit.
  6. Place the brie and the baguette on a silpat and cook for 8 minutes.photo 3
  7. when the brie is ready, remove it from the oven.photo 1
  8. Place it on a plate and eat with the sliced bread, and sliced apples. You can also serve a salad to eat along. Et voila!

photo 3

Bon Appetit and Happy Cooking!!!

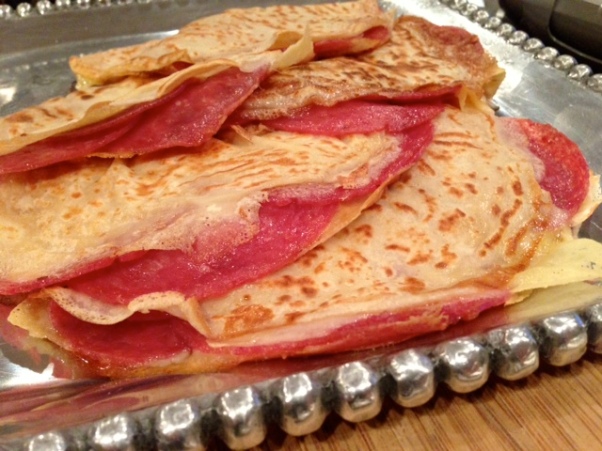
Crepes filled with Swiss Cheese and Salami


photo

Yesterday was La Chandeleur in France. For those of you who may not know what Chandeleur is, it is National French Pancake Day. I am not very familiar with the reason why we eat crepes on that day,  but supposedly Pope Gelase I gave out pancakes to the Romans who came to town on that day, and this is why today, people eat crepes…

I will tell you that growing up, I did not need to have a reason to eat crepes because they were my favorite things to eat, and they are still my favorite things to eat today.

This evening nothing fancy. I just wanted to fix a few to keep up the tradition at home. I made a cake of crepes ( that I will show you later), and made a few with some swiss cheese and salami.

Ingredients for 12-15 crepes:

  • 6 tablespoons of flour
  • 1/3 can of beer
  • 1/2 cup of milk
  • 2 eggs
  • 2 tbsp of butter
  • 1lb of slices swiss cheese
  • 1/2 lb of slices salami or any other meat.
  1. Take a large bowl and place the flour in the bowl.
  2. Curve a hole in the flour, and slowly pour the milk while mixing with a whisk.
  3. Be careful to whisk slowly so as to make the mixture smooth and free of lumps.
  4. Then add the eggs one at a time and mix well. Add the beer and mix well also. The mixture should be smooth and liquid, but not too liquid.
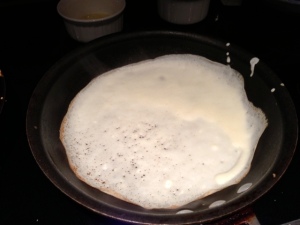
  5. Turn the stove to medium high and place the frying pan on the stove. The frying pan should be hot before starting to fix the pancakes.
  6. With a paper towel or a brush, spread butter on the walls of the frying pan and pour a small ladle of crepe mixture.
  7. Move the frying pan in a circle motion so that the dough has spread to the entire surface of the pan.
  8. Cook for 1 minute.photo
  9. With a spatula, flip the crepe, place 3 slices of cheese, 5 slices of salami all around the crepes.photo
  10. Fold the crepe in half and cook for 1 minute or less.
  11. Place the crepes flat on a plate. Continue the process until you have exhausted all the batter. Et voila!!!

Bon Appetit and Happy Cooking!!!

Beet Salad with Meyer Lemon Vinaigrette


Only few weeks ago I had to wear hats on cold days and bundle up. It is strange how weather can change so drastically. Today it is already 82. Where has spring gone to????

With this weather change luckily comes craving of fruits and vegetables. I believe that I had mentioned in one of my previous posts that in the summer in France, for appetizers we have “crudites”, which is an array of various salads. Generally it would be cucumber, or carrot, or even celery root salad. I know, some of you may think… Yuk..But well-seasoned, those salads are really good and bring a bit of a change to the boring green salad. I have always liked beets. Growing up my mom always bought beets in a can. To prepare her salad, she always sliced the beets in 1/2 centimeter thick and season them with a red wine vinaigrette.

All winter long I had seen those fresh beets in the fresh produce section, but never dared to buy them until yesterday. WHY? because again I would have been the only one eating them here at my house. Well, I could not resist seeing them again and really wanted to eat a beet salad so here they are today;-)

Ingredients for a salad for 4: 3 fresh beets rinsed and peeled, 1 tbp of Meyer lemon zest, the juice of half of a Meyer lemon, 1 tbsp of olive oil, 2 tbsp of sherry vinegar, 1/8 tsp of salt, 1/16 tsp of pepper.

Place the beets in the round mold and place the octogonal silpat on top to cover it. Cook in the microwave for 8 minutes. They should be soft. Meanwhile grate one half of a Myer lemon to have about 1 tbsp of zest, and squeeze the lemon juice. In a medium-sized bowl, mix the zest, the lemon juice, 2 tbsp of sherry vinegar, 1/8 tsp of salt, 1/16 tsp of pepper and mix well. Add the beets that you would have cut in a small cubes. Mix well and enjoy…

Bon Appetit and Happy Cooking!!!