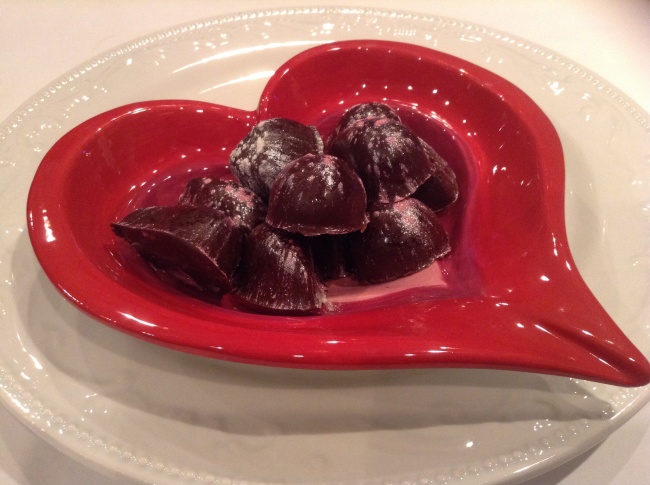
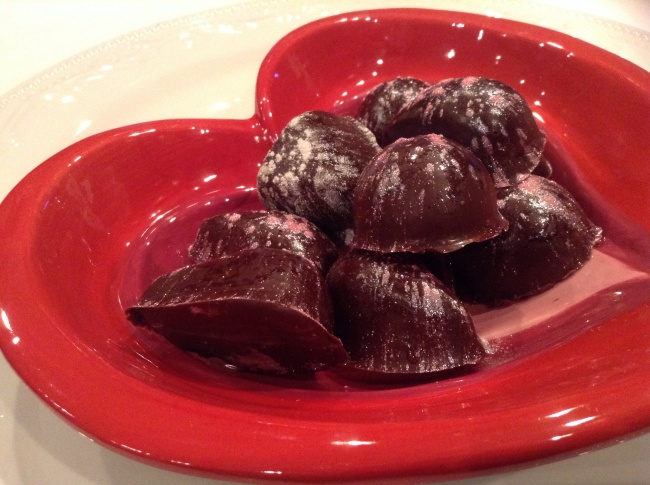
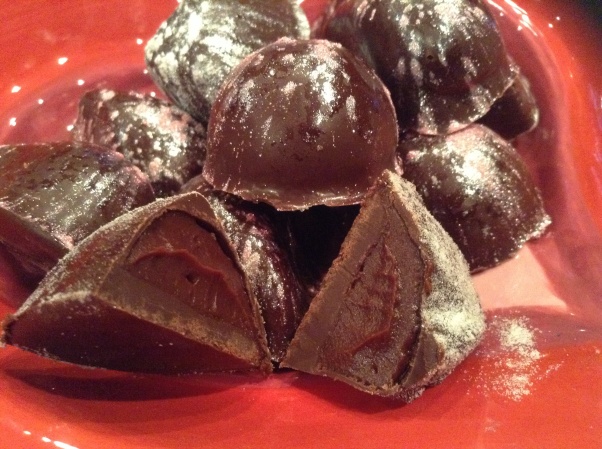
Marzipan Truffles


IMG_4622

What is Valentine’s Day? A day where we are given the chance to express our love, and feelings to a person who may know, or not know about us. It is a day where people flock to stores to buy boxes of chocolates, flowers and cards. We are brought to think that we have to buy things to show our love when we should just do things to show our love. Valentine’s Day should be a day to spend with your loved ones. It is having tea with your grandparents, going to the gym with the person that cares about you.  It is cooking dinner from scratch with everyone!!! Not just you in the kitchen. It is going for a jog and then going for brunch. It is so many things…

IMG_4623

It does not have to be fancy as long as it is with your loved ones, as long as it is planned.

Valentine’s day at our house was not fancy … We did not dress up. We did not buy fancy things..

I spent my week-end making things for my love ones. I made Raspberry, Banana, Pistachio Macarons for my in-laws, Pralinés and Marzipan chocolates for my husband. And my husband and I, we shopped together for what we were going to cook together.

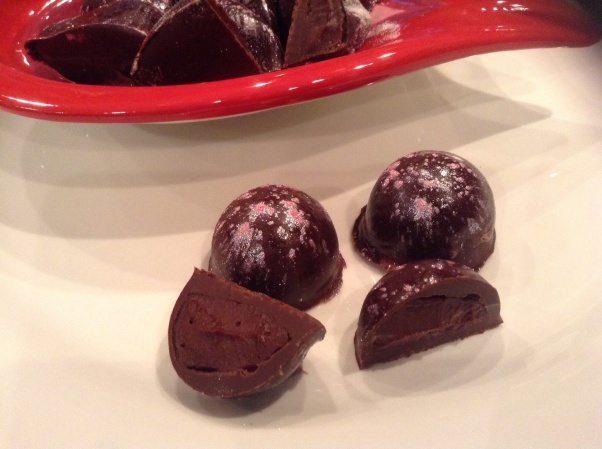
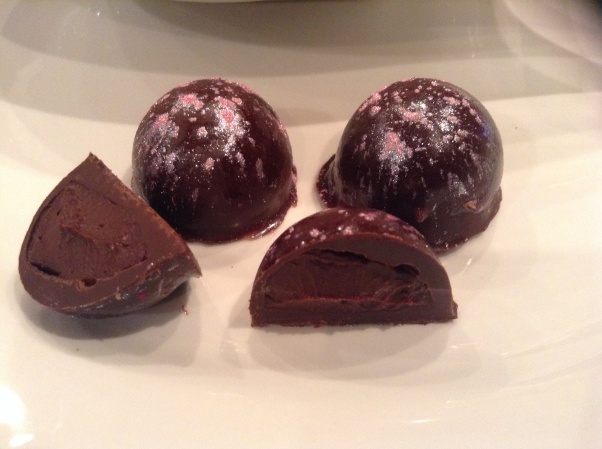
My husband most favorite thing to eat, besides POTATOES ( kidding lol), is marzipan. It is very hard to find good ones in the States. And if you do find some,they are very expensive. Do you know that it is actually very easy to make some. So I actually decided to make some heart-shaped chocolate truffles for today. I thought I would share.

IMG_4624

Ingredients for about 30 truffles:

  • about 4 oz. of ghiradhelli dark chocolate chips of coating
  • about 3 oz. of ghiradhelli White chocolate for decoration
  • 1½ cup blanched almond 
  • 1½ cup powdered sugar
  • 1/2 tbsp quality pure almond extract
  • 1/2 tsp rose-water
  • 1 egg white 
  1. Warm up the chocolate into a small bowl for 90 seconds and with a pastry brush, brush the sides of each heart.IMG_3578
  2. place the tray in the fridge so that the chocolate will cure. Meanwhile prepare the marzipan.
  3. Place the almond in the chopper and chop them until you have a powder mixture.IMG_3574
  4. Add to it the powdered sugar in a food processor and pulse until combined and any lumps are broken up.IMG_3575
  5. Add the almond extract and rose-water and mix to combine.
  6. Add the egg white and process until a thick dough is formed. If the dough is still too wet and sticky, add more powdered sugar and ground almonds. It will firm up once it is refrigerated however.IMG_3579
  7. Take the marzipan dough onto the roul’pat and knead a few times.IMG_3580
  8. Form it into a log, wrap it up in plastic wrap and refrigerate.
  9. Take the log out, cut some pieces out.IMG_3582
  10. Place one piece in each opening. Press down so that the marzipan is filling completely the chocolate heart.IMG_3584
  11. Place the tray in the fridge to cool.
  12. Warm the chocolate and close up the chocolate heart.IMG_4615
  13. Place the tray back in the fridge.
  14. gently remove the heart from the tray.IMG_4617
  15. You may need to trim the edges of the heart with a knife for smoother edges.
  16. For added decoration, decorate the chocolate with colored chocolate.
  17. Place the chocolate onto the roul’pat together.
  18. Place about 3 oz. of white chocolate of Ghiradhelli into a small bowl. Place it into the microwave and melt it for 90 seconds. Add some coloring of your choice. I used a dot of burgundy Wilton.
  19. Place the chocolate into a small plastic bag and drizzle over the chocolates.
  20. Let the chocolates cures before touching them. IMG_4618
  21. Package the chocolates at your likings. Et voila!!!

IMG_4623

Marzipan Truffles

  • Servings: 30 people
  • Difficulty: Easy
  • Print

IMG_4623

Ingredients for about 30 truffles:

  • about 4 oz. of ghiradhelli dark chocolate chips of coating
  • about 3 oz. of Ghiradhelli White Chocolate Chips for decorating
  • 1½ cup blanched almond
  • 1½ cup powdered sugar
  • 1/2 tbsp quality pure almond extract
  • 1/2 tsp rose water
  • 1 egg white
  1. Warm up the chocolate into a small bowl for 90 seconds and with a pastry brush, brush the sides of each heart.
  2. Place the tray in the fridge so that the chocolate will cure. Meanwhile prepare the marzipan.
  3. Place the almond in the chopper and chop them until you have a powder mixture.
  4. Add to it the powdered sugar in a food processor and pulse until combined and any lumps are broken up.
  5. Add the almond extract and rose-water and mix to combine.
  6. Add the egg white and process until a thick dough is formed. If the dough is still too wet and sticky, add more powdered sugar and ground almonds. It will firm up once it is refrigerated however.
  7. Take the marzipan dough onto the roul’pat and knead a few times.
  8. Form it into a log, wrap it up in plastic wrap and refrigerate.
  9. take the log out, cut some pieces out, and place one piece in each opening. press down so that the marzipan is filling completely the chocolate heart.
  10. Place the tray in the fridge to cool.
    Warm the chocolate and close up the chocolate heart.
  11. Place the tray back in the fridge.
  12. Gentlty remove the heart from the tray.
  13. You may need to trim the edges of the heart with a knife for smoother edges.
  14. For added decoration, decorate the chocolate with colored chocolate.
  15. Place the chocolate onto the roul’pat together.
  16. Place about 3 oz. of white chocolate of Ghiradhelli into a small bowl. Place it into the microwave and melt it for 90 seconds. Add some coloring of your choice. I used a dot of burgundy Wilton.
  17. Place the chocolate into a small plastic bag and drizzle over the chocolates.
  18. Let the chocolates cures before touching them.
  19. For added decoration, melt more colored chocolate and drizzle over the chocolates.
  20. Package the chocolates at your likings. Et voila

Bon Appetit and Happy Cooking!!!

Strawberries Balls for The Super Bowl


IMG_4522

What type of food are you offering your guests for Super bowl??? Well, if I were hosting, I would be making all kinds of food… But I am not. We will be joining some friends of ours. So Guess what??? I will only be making a few things. Mini Pretzels, Mustard, Ham and Cheese Pretzels Bites and Chocolate Covered Strawberries.

I will be posting those recipes very soon. But today I am just going to share with you the easiest of all desserts: Chocolate Covered Strawberries.

All you need is good quality Chocolate, and fresh strawberries.

IMG_4520

Ingredients for 1 box of chocolate or about 30 strawberries:

  • 1 box of strawberries
  • 6 oz. of bittersweet chocolate from Ghiradhelli
  • 1 0z of white chocolate

I love the Ghiradhelli Chocolate because it is the ONLY chocolate that will melt perfectly to a liquid form in the microwave so Do not use Hershey, or Nestlé. The chocolate will not melt unless you add butter.

  1. Place the chocolate chips in a small bowl. Place the chocolate chips in the microwave for 90 seconds. Stir and place it back into the microwave for 5 to 10 seconds if needed.
  2. Take one strawberry at a time, and dip it in the chocolate. Place the chocolate onto a large silpat that you would have previously placed on a perforated sheet for support. Repeat until it is done.IMG_4471
  3. Place the strawberries into the fridge to cool. When the chocolate has settled.
  4. Place the white chocolate into a small container and melt it the microwave for a few seconds ( 30 seconds). It should soft to the fingers. IMG_4532
  5. Pour the melted chocolate into a small plastic bag. Push the chocolate to the end of the plastic bag.IMG_4533
  6. Cut the tip and draw lines on the strawberries to make it look like the football.IMG_4473
  7. Place the strawberries back into the fridge to cool. Et voila!!!IMG_4519


Bon Appetit and Happy Cooking!!!

Football Strawberries for Super Bowl

  • Servings: 10
  • Difficulty: Super Easy
  • Print

IMG_4522

Ingredients for 1 box of chocolate or about 30 strawberries:

  • 1 box of strawberries
  • 6 oz. of bittersweet chocolate from Ghiradhelli
  • 1-0z of white chocolate
  • 1 plastic bag

I love the Ghiradhelli Chocolate because it is the ONLY chocolate that will melt perfectly to a liquid form in the microwave so Do not use hershey, or Nestlé.

  1. Place the chocolate chips in a small bowl. Place the chocolate chips in the microwave for 90 seconds. Stir and place it back into the microwave for 5 to 10 seconds if needed.
  2. Take one strawberry at a time and dip it in the chocolate. Place the chocolate onto a large silpat that you would have previously placed on a perforated sheet. Repeat until it is done.
  3. Place the strawberries into the fridge to cool. When the chocolate has settled.
  4. Place the white chocolate into a small container and melt it it the microwave for a few seconds ( 30 seconds).
  5. Pour the melted chocolate into a small plastic bag. Push the chocolate to the end of the plastic bag.
  6. Cut the tip and draw lines on the strawberries to make it look like the football.
  7. Place the strawberries back into the fridge to cool. Et voila!!!

Bon Appetit and Happy Cooking!!!

Feuille D’Automne


IMG_3453


Don’t you love fall. The air is getting cooler, the leaves on the tree change to orange and red, and you start smelling cinnamon in all the places you go. Cinnamon in the apple ciders, in the apple tarts and in the pumpkin pies.. I love fall for all those reasons, but also because I don’t feel so guilty cooking scrumptious desserts in those cool days. One of  my favorite cake to prepare around this time of the year is called Feuille D’automne, or Fall leaves. The recipe was originally created by Gaston LeNotre ( reknown French Pastry Chef) in 1968. It is today a signature cake at all his pastry stores and restaurants. It is made with an almond Meringue, and a dark chocolate mousse. His recipe was adapted by me to make it a little less challenging. It is a beautiful cake that is also succulent. I challenge you to bring one at your next Thanksgiving gathering!!!

IMG_3456

Ingredients for a cake for 8-12 people:

You will need to make 3 almond meringue disks,  a chocolate mousse.

Ingredients for the Almond Meringues, also called Succes:

  • 100 g de poudre d’amandes tamisée
  • 100 g de sucre glace
  • 200 g de blancs d’œufs
  • 160 g de sucre en poudre

Ingredients for the Chocolate Mousse:

  • 500 gr. / 1 lb bittersweet chocolate
  • 125 gr. / 4 oz butter
  • 180 gr. / 6 oz egg yolks
  • 250 gr. / 8 oz egg whites
  • 75 gr. sugar

Ingredients for the Chocolate Decoration:

  • 400 gm dark chocolate couverture
  • cocoa powder
  • confectioners’ sugar
  1. In a large bowl, sift the almond flour and the powdered sugar and set it aside.
  2. In the bowl of a kitchen mixer, put the egg whites and whip until they are foamy.
  3. Slowly add the sugar and continue to beat the egg whites until they are forming soft peaks. See below.
  4. photo 1
  5. Add the almond mixture to the whipped eggs.IMG_7245
  6. Fold the almond carefully so that the eggs will not deflate.IMG_7246
  7. Lay a large silpat onto a large perforated sheet and pipe the almond meringue into circles to make 3 rounds of about 9 inches.IMG_7247
  8. Cook in a warm oven of 250 for 90 minutes. Set aside. IMG_7248
  9. We are now ready to make the mousse which is the filling  in between the meringue layers.
  10. Place the chocolate chips into a bowl and melt the chocolate either on the stove over boiling water, or in the microwave for 2 minutes.  Add the butter and mix well.
  11. Beat the egg whites into hard peaks and slowly add the beaten egg whites to the chocolate mixture.photo 5
  12. To assemble the cake, place the metal round on top of medium silpat that would be placed on a medium perforated sheet, or fill 1/3 of the medium round mold with the chocolate mousse. Place one of the meringue disk above the mousse. Fill the other third of mousse, cover it up with another meringue.  Place the last disk and end with the mousse.photo 1
  13. Place the cake into the fridge overnight or for at least 4 hours.
  14. When the cake is ready, Remove the cake from its mold either by peeling the silicone mold or removing the metal ring.IMG_3443
  15. To prepare the chocolate that will wrap the cake, warm up  the chocolate to a liquid state. Place a plastic wrap at the bottom of a metal pan, or a deep flexipan and spread the chocolate so that it will cover the entire pan in a very thin layer. Place the pan into the fridge or the freezer and let it harden. photo 2photo 3
  16. Let the chocolate cool at room temperature until the chocolate begins to get cloudy. Refrigerate to set completely.
  17.  When the chocolate is set, bring the pans back to room temperature and wait a few minutes until the chocolate is pliable but not soft.
  18. Draw strips of about 4 to 3 1/2 inches into the chocolate.
  19. With a sharp knife, cut the strips.
  20. Lift off the strip of chocolate and place the thin strips around the cake to hide the cake contours. Repeat to cover the entire diameter of the cake. IMG_3444

IMG_3445

21. the chocolate will be somewhat soft enough to wrap the outside of the cake, but you will not be able to bend it. Let the cake rest for a few minutes and you will see that the chocolate will be able to fold and you will be able to fold it over the top.


IMG_3447

IMG_3448

22. With the rest of the chocolate, you can either make waves or make shavings that you would place on top of the cake for decoration.

23. Sprinkle some powdered sugar on top for added decoration.

IMG_3449

IMG_3451
Bon Appetit and Happy Cooking!!!

Feuille D'Automne

  • Servings: 8-12 people
  • Difficulty: Moderate
  • Print

IMG_3456

Ingredients for a cake for 8-12 people:

You will need to make 3 almond meringue disks, a chocolate mousse.

Ingredients for the Almond Meringues, also called Succes:

  • 100 g de poudre d’amandes tamisée
  • 100 g de sucre glace
  • 200 g de blancs d’œufs
  • 160 g de sucre en poudre

Ingredients for the Chocolate Mousse:

  • 500 gr. / 1 lb bittersweet chocolate
  • 125 gr. / 4 oz butter
  • 180 gr. / 6 oz egg yolks
  • 250 gr. / 8 oz egg whites
  • 75 gr. sugar

Ingredients for the Chocolate Decoration:

  • 400 gm dark chocolate couverture
  • cocoa powder
  • confectioners’ sugar
  1. In a large bowl, sift the almond flour and the powdered sugar and set it aside.
  2. In the bowl of a kitchen mixer, put the egg whites and whip until they are foamy.
  3. Slowly add the sugar and continue to beat the egg whites until they are forming soft peaks.
  4. Add the almond mixture to the whipped eggs.
  5. Fold the almond carefully so that the eggs will not deflate.
  6. Lay a large silpat onto a large perforated sheet and pipe the almond meringue into circles to make 3 rounds of about 9 inches.
  7. Cook in a warm oven of 250 for 90 minutes. Set aside.
  8. We are now ready to make the mousse which is the filling in between the meringue layers.
  9. Place the chocolate chips into a bowl and melt the chocolate either on the stove over boiling water, or in the microwave for 2 minutes.
  10. Add the butter and mix well.
  11. Beat the egg whites into hard peaks and slowly add the beaten egg whites to the chocolate mixture.
  12. To assemble the cake, place the metal round on top of medium silpat that would be placed on a medium perforated sheet, or fill 1/3 of the medium round mold with the chocolate mousse. Place one of the meringue disk above the mousse. Fill the other third of mousse, cover it up with another meringue. Place the last disk and end with the mousse.
  13. Place the cake into the fridge overnight or for at least 4 hours.
  14. When the cake is ready, remove the cake from its mold either by peeling the silicone mold or removing the metal ring.
  15. To prepare the chocolate that will wrap the cake, warm up the chocolate to a liquid state. Place a plastic wrap at the bottom of a metal pan, or a deep flexipan and spread the chocolate so that it will cover the entire pan in a very thin layer. Place the pan into the fridge or the freezer and let it harden.
  16. Let the chocolate cool at room temperature until the chocolate begins to get cloudy. Refrigerate to set completely.
  17. When the chocolate is set, bring the pans back to room temperature and wait a few minutes until the chocolate is pliable but not soft.
  18. Draw strips of about 4 to 3 1/2 inches into the chocolate.
  19. With a sharp knife, cut the strips.
  20. Lift off the strip of chocolate and place the thin strips around the cake to hide the cake contours. Repeat to cover the entire diameter of the cake.
  21. 21. the chocolate will be somewhat soft enough to wrap the outside of the cake, but you will not be able to bend it. Let the cake rest for a few minutes and you will see that the chocolate will be able to fold and you will be able to fold it over the top.
  22. With the rest of the chocolate, you can either make waves or make shavings that you would place on top of the cake for decoration.
  23. Sprinkle some powdered sugar on top for added decoration.

Bon Appetit and Happy Cooking!!!

Soft Balls for the Superbowl;-)


IMG_1091

To keep with the news, why not make soft balls for the Superbowl:-)

I am just kidding. But since this year Superbowl is all about soft and spongy balls, we decided to bring this time not a Super Bowl cake, but molten chocolate mini cakes.

Ingredients for 40 mini footballs:

  • 5 eggs
  • 2 sticks of unsalted butter
  • 8 oz of good quality chocolate ( ghiradhelli)
  • 1/2 cup of sugar
  • icing of your choice to make the lines on the cheese
  1. Place the chocolate and the butter in a small bowl and microwave it for 90 seconds. IMG_1078
  2. Meanwhile, beat the sugar and the eggs together a few strokes ( enough so you will not see the sugar any more.)IMG_1077
  3. Mix the butter and the chocolate chips so that it will look like syrup. IMG_1079
  4. Pour the chocolate mixture into the egg mixture and stir. IMG_1080
  5. At first it will be very liquid, but as you stir, it will become thicker and looks like goo. IMG_1081
  6. Pour the mixture into the mold of your choice. I chose the quenelle mold, but you can use the mini muffin mold. IMG_1083
  7. If you choose this mold, cook the cakes for 5 minutes for 400. IMG_1085
  8. Let the cakes cool completely in the mold until they are cold. IMG_1087
  9. Unmold them, and decorate them as you wish. I chose brown icing to make the lace of the balls. IMG_1089Enjoy!!!

Soft SuperBowls

  • Servings: 10-20 people
  • Difficulty: Super Easy
  • Print

IMG_1089

Ingredients for 40 mini footballs:

  • 5 eggs
  • 2 sticks of unsalted butter
  • 8 oz of good quality chocolate ( ghiradhelli)
  • 1/2 cup of sugar
  • icing of your choice to make the lines on the cheese
  1. Place the chocolate and the butter in a small bowl and microwave it for 90 seconds.
  2. Meanwhile, beat the sugar and the eggs together a few strokes ( enough so you will not see the sugar any more.)
  3. Mix the butter and the chocolate chips so that it will look like syrup.
  4. Pour the chocolate mixture into the egg mixture and stir.
  5. At first it will be very liquid, but as you stir, it will become thicker and looks like goo.
  6. Pour the mixture into the mold of your choice. I chose the quenelle mold, but you can use the mini muffin mold.
  7. If you choose this mold, cook the cakes for 5 minutes for 400.
  8. Let the cakes cool completely in the mold until they are cold.
  9. Unmold them, and decorate them as you wish. I chose brown icing to make the lace of the balls.Enjoy!!!

Bon Appetit and Happy Cooking!!!

If you like what you read or see, please share;-) Merci beaucoup!!!

Homemade Bounty


photo 2
In the evening, after dinner, my husband likes to fix himself a cup of coffee, and sit on his sofa to watch a movie. He also likes to eat “a betthupfer” ( evening treat)  while watching his movie. It can be an ice-cream, a dessert that I made, a chocolate bar, or even a bag of those miniature candy bars ( Milkie way, Twix, Almond joy).

As I was scrolling through the internet in search of ideas for my cooking classes, I came across the Almond Joy, or Bounty recipe. It looked so easy that, of course, i could not pass it. So Here it is:

For About 30 small bounty:

  • 1 can of condensed Milk
  • 300 gr. of coconut flakes
  • Chocolate Chips
  1. In a large bowl mix the coconut flakes and the condensed milk, and mix well.photo 1
  2. With a small spoon, pick a tablespoon of that mixture and mold it into a small oval that you will place on the silpat that you would have placed on a large perforated sheet. Continue until all has been used.photo 1
  3. Place them into the freezer to freeze for a minimum of an hour.
  4. When the coconut is hard, place the chocolate into a microwable bowl and cook it for 90 seconds. Stir with a fork. If needed, cook for another 30 seconds or until the chocolate is liquid.
  5. Place a coconut oval onto a fork and dip it into the melted chocolate. Place the chocolate covered coconut onto the silpat again. Place the tray back into the freezer so that the chocolate will cure.

Or

  1. With a pastry brush, “paint” the inside of the mold of your choice. I used two trays: the oval tray and the pop tray. Place the tray into the fridge, or freezer to cure the chocolate.photo
  2. Meanwhile, prepare the filling. Mix together the coconut flakes and the condensed milk and fill the cavities of the tray. photo 2
  3. Place the tray back into the freezer. Let it rest for 30 minutes to an hour or until the coconut is frozen.
  4. With the pastry brush, brush the top of the coconut, and voila!!!photo 3
  5. Cheap Home-made Bounty. Yummm!!! You try!photo

Bon Appetit and Happy Cooking!!!


Graduation Cupcakes


photo 3

My oldest child, Lisa, graduated from High school this past Friday. What a milestone. As a parent, we are very proud when our children succeed and do well in school, but watching them walking up that stage is a feeling like no other. My heart was filled with lots of emotions: Pride, Joy and Sadness. I was proud, of course, of her and her accomplishments. I was happy to see her excitement when she received her diploma. And as you would imagine I was also a bit sad to realize that this young beautiful lady walking up that stage was my baby not too long ago, and that time has flown too quickly;-(

I am certain that if you have children, you have or will feel the same way I did. But for us, those feeling were even more important because she is and was the first person in our family to graduate from an American school!!! For my husband and I, this is something we had seen on TV until this past Friday. So it was very special to see our daughter walk that stage and receive her diploma;-) One that i will not forget!!!

Anyway, to celebrate this wonderful milestone, we had a few friends over for dinner. Nothing fancy, hamburgers, hot-dogs and a few other things. But for dessert, I had to make it special so we made:

 Tuxedo strawberriesphoto 1

Blueberries and White chocolate mousse

photo 2

and Graduation Cupcakes.

photo 1

Ingredients for about 25 mini cupcakes:

photo 5

  • 1 cups of flour,
  • 1/2 cup of granulated sugar,
  •  3/4 tsp of baking soda,
  • 1/4 tsp of salt,
  • 1/4 cup of unsweetened chocolate powder,
  • 1 egg at room temperature,
  • 1/2 stick of butter,
  • 1/2 cup of brown sugar,
  • 1 tsp of vanilla extract,
  • 1/2 cup of lukewarm water,
  • 1/4 cup of buttermilk.
  1. In a bowl, sieve the flour, baking soda, salt and chocolate powder, and set aside.
  2. In a mixer, place the butter and the granulated sugar and the brown sugar and beat until it becomes light and fluffy.
  3. Then add the egg and beat it in.
  4. Add the vanilla.
  5. In a bowl, mix the water and the buttermilk.
  6. Incorporate the flour mixture in three times, mixing in the water mixture in between each time.
  7. Beat at a very low-speed, just enough to mix the flour in well.
  8. Beat on high for a minute until all the ingredients have been incorporated.
  9. Empty the batter into a ziplock bag, cut a corner and fill each of the cupcake openings to about 2/3.
  10. I used the mini muffin tray from Demarle.
  11. I cooked the cupcakes 12 minutes. Let the cupcakes cool before piping the frosting.

Frosting:

  • 1 bag of bittersweet Guiradhelli chocolate chips,
  • 1 1/2 sticks of butter at room temperature,
  • 1/2 cup of sour cream,
  • 1/4 cup of sugar.
  1. Place the chocolate in a microwaveable bowl and heat the chocolate up for 90 seconds. Stir and cook it again for another 30 seconds. Repeat if necessary.
  2. Let the chocolate cool a bit, then add the butter and beat it.
  3. Add the sour cream and beat on high until it fluffed up. If it is still too soft, place it in the fridge for a few minutes to get cold.
  4. Take it back out and beat it to fluff it up.
  5. PLace the large round tip inside the pastry bag.
  6. Place the frosting in a pastry bag and pipe the frosting on top of the cupcakes.

For the Decoration:

  • 1 bag of large reese cups
  • 3 barks of bittersweet chocolate from ghiradhelli
  • one bag of M&M
  • Sour Patch candy
  • 1 square of vanilla chocolate bark
  1. Unwrap the reese cups. Then cut squares of chocolate of about 1 inch.
  2. Place a bit of the frosting on top of the Reese and place the chocolate square.
  3. With a bit of frosting, glue the M&M on top of the chocolate square.
  4. With scissors, cut small strips into the sour patch candy, and attach the strip onto the chocolate square to make it look like the tassel.
  5. Place the vanilla bark into a small container and microwave it for 20 seconds.
  6. Pour the chocolate into a small piping bag, or even into a ziploc bag and write the date of the graduation year.

Et voila!!! Enjoy!!!


photo 5

Bon Appetit and Happy Cooking!!!


Homemade Chocolate Truffles


Image

In one post, I tried to offer a light substitution to hot cocoa, and in another I offer a recipe of chocolate truffles. Well, what can i say??? I love chocolate so much that I want to be able to enjoy it without guilt and sometime i have to find ways to cut down those calories that is why I posted the recipe of a light hot cocoa.

Chocolate is really one of my weaknesses. I love it, and need it at then end of my meal to satisfy my sweet tooth;-) I try not to indulge much because my trainer will fuss at me… But when I can indulge, then I want the real thing!!!

As a French person, I am  a bit of a snob and only eat European Chocolates. It is perhaps because the European Chocolates or truffles have a higher content of chocolate and taste like chocolate. Here in the US, my favorite is Godiva. The problem is that they are only sold in certain places and are quite expensive. Of course I could just buy some of the truffles already packages but they don’t exactly taste the best.  Well with Valentine’s Day around the corner and me stuck at home in a snow storm  I thought to make some truffles today. They are fun to make, and really not that expensive.

Real  truffles are not hard to make, they just require a mold, and patience. Truffles can come in many flavors, but most of the time the filling is made either with ganache, buttercream, or craquin.

Today I will offer you a recipe that is very easy and is bound to be liked by many.

Image

Ingredients for a tray of about 30 truffles:

  • 1 / 2 bag of ghiradhelli ( sweet, milk or bittersweet)
  • 100 gr. of chocolate chips
  • 100 gr. of cream
  • flavors of your choice ( 1/2 tsp of raspberry essence,  1/2 tsp of almond extract, and 1/2 tsp of orange extract)
  • Glitter for decoration

image

  1. Place the chocolate  in a microwaveable bowl and microwave the chocolate for 90 seconds or until the chocolate is liquid and free of lumps.
  2. With a brush, brush the inside of each indentation of the truffle mold. PLace the truffles in the fridge for the chocolate to cure.
  3. Rebrush the inside for another coat so that the truffles will not be too thin. Place the tray back into the fridge.
  4. Meanwhile place the cream into the microwave for 90 seconds and pour it over the chocolate chips,. Let it sit for a few seconds. Then with a small whisk, stir the cream to make a smooth ganache.
  5. Divide the ganache in 3 equal portions. Then add a few drops of the flavor that you wish. Today I used almond, orange and raspberry.
  6. Fill the ganache in the truffles. Then place them into the freezer to cure.
  7. Rewarm the chocolate and brush the top of each truffle to close them up. Place them back into the fridge to cure. decorate as you wish.
  8. To decorate them, I brush each truffle with clear vanilla syrup and sprinkle over them .image
  9. Et voila!

image

The truffles are wonderful to eat cold or at room temperature. Your turn to be creative!!!!

Bon Appetit and Happy Cooking!!!

Poire Belle-Helene Revisited


photo 3

One of my dad’s favorite was Poire Belle-Helene, or Pear Belle Helene. It is a dessert made of Poached Pears atop vanilla ice-cream, and covered with Chocolate Syrup and toasted almond. It is delicious and really easy to do.

According to Wikepedia, “Poire belle Hélène was created around 1864 by Auguste Escoffier and named after the operetta La belle Hélène by Jacques Offenbach.” The original  Simpler versions replace poached pears with canned pears and crystallized violets with sliced almonds.

I love the combination of vanilla, chocolate and pear. It is a comforting dessert, warm and delicious.

This past Saturday I was in the mood for those combinations, but was also craving cheesecake instead of ice-cream so that is when I decided to combine all those ingredients to make this dessert.

photo 1

Ingredients for 12 people: 

Ingredients for the Pear Compote:

  • 3 pears peeled and cored
  • 1/3 cup of sugar
  • 1 1/2 cup of water
  • 1/8 tsp of tonka powder, if you can’t find any replace with cardamom
  1. After coring and peeling the pears, slice them in half and cube them very small.
  2. In a medium-sized saucepan, melt 2 tablespoons of butter and when the butter is sizzling, add the diced pears. Mix well.photo 1
  3. Add the sugar, the water and the tonka or cardamom spice.
  4. Bring to a boil and when it is boiling, reduce the heat down and cook until the liquid has reduced to half.
  5. When it is done, remove it from the heat and let it cook completely.

Ingredients for the Chocolate Syrup:

  • 1 cup of chocolate of good quality ( I use Ghiradhelli)
  • 1 cup of heavy cream
  1. Place the heavy cream into a microwable safe bowl and cook the cream for 2 minutes or until it is really hot. ( you may cook the cream over the stove if you do not want to use the microwave).
  2. Place the chocolate chips into a small bowl. Pour the hot cream over it and let it sit for a few minutes.photo 4
  3. After a few minutes mix the cream and the ganache will be perfect, free of lumps;-)photo 5

Ingredients for 12 individual lingot cheesecakes:

  • ▪ 387.5 gr  or about 14 oz of cream cheese at room temperature ( about 1 1/2 cream cheese bar)
  • 110 gr.  or about 1/2 cup of sugar
  • ▪100 gr.  or about 1/2 cup of sour cream
  • 80 gr.  or about 2 medium-sized eggs
  • 13 gr. , or about 3 tsp of egg yolks
  • 13 gr. , or about 3 tsp of corn starch
  • 70 gr. , or about 1/4 cup and 1 tsp of heavy cream
  • a vanilla bean
  1. Place the cream cheese in a kitchen mixer and beat it.
  2. Add the sour cream and mix again.
  3. Add the sugar, egg yolks, eggs and beat it again until the texture is free of lumps.
  4. remove the vanilla seeds from the bean with a sharp knife and mix it with the heavy cream. Add the corn starch and beat until the mixture is smooth.
  5. Pour the mixture into a fleximold of your choice. I chose the lingot tray.
  6. Cook in the oven for 50 minutes at 194.
  7. When the cheesecakes are cooked, let them cool and place them in the fridge to cool for a few hours ( overnight is better).photo 2
  8. The following day, remove the cheesecake one at a time and dip them into the warm chocolate ganache to half.photo 3
  9. Place the cheesecake on individual plates.
  10. Place a few tablespoons of the pear compote on top of the cheesecake and drizzle of bit of the chocolate on the side of the cheesecake for added decoration. Et voila!

photo 3

If you wish to serve more pear compote, spoon the pear compote on the plate, place the cheesecake on top of it, drizzle some chocolate over the cheesecake et voila!

photo 2

Bon Appetit and Happy Cooking!!!

Almond and Cream Cheese Brownie


photo

It had been a while since I made some brownies. Not because I don’t like them, but because if I make them i will eat them, and I do not, do not need to eat them.

Well this past Wednesday we had a faculty meeting at our school, and many times teachers are asked to bring a snack to serve at those meetings. This time was my turn. After thinking what to cook, I decided on something chocolate. Who does not like chocolate???Brownies are also so easy to make that I decided to make a batch. Of course, it is more fun to try a new recipe than to use an old one so I used a new one from “Chocolate” by Better Homes and Garden 2012.

Ingredients for about 40 small brownies:

  • 3 oz cream cheese at room temperature
  • 2 tbsp of butter softened
  • 1/4 cup of sugar
  • 1 egg
  • 1  1/4 cup of flour and 1 tbsp of flour
  • 3/4 tsp of baking powder
  • 1/2 tsp of salt
  • 6 oz. of chocolate chips
  • 3/4 cup of butter
  • 2 1/4 cup of sugar
  • 4 eggs
  • 1/4 cup of milk
  • 1 tsp of vanilla
  • 1 tsp of almond extract
  1. Turn the oven to 375. Place the flexipat on a medium perforated sheet. Place the metal frame inside the flexipat.
  2. In a bowl, stir 1 1/4 cup of flour, baking powder, sat and set aside.
  3. In a bowl, place the chocolate and 1 stick and 1/2 of butter and microwave for 90 seconds or until they are both completely melted.
  4. Add 2 1/4 cup of sugar to the chocolate mixture while beating on low-speed.
  5. Add the eggs one at a time and beating well each time.
  6. Add the milk, vanilla and almond extract and mix well.
  7. Add the flour and mix well.
  8. Spread this mixture into the flexipan. Shake the pan by hitting the end against your counter to make the batter spread evenly out.
  9. Set aside.
  10. In a small mixing bowl, mix the cream cheese and 2 tbsp of butter until it is becoming creamy.
  11. Add 1/4 cup of sugar and mix well.
  12. Add the egg and mix. Then add 1 tbsp of flour and combine.
  13. Pour this mixture over the batter into lines.
  14. With a knife, go from left to right to make zizzag pattern into brownie.
  15. Bake for 30 minutes.photo
  16. Cool in the pan completely before unmolding the cake and cutting it into squares.

photo

Et voila!

Bon Appetit and Happy Cooking!!!

Out of This World Chocolate Eclairs


photo

Saturday evening I had guests for dinner. What to fix for desserts??? The choices are endless…but it had been a while since I had eaten eclairs and I really did not want to make a cake. What I knew that it needed to be chocolate so I made chocolate eclairs:

Ingredients for 8 normal-size eclairs or 16 small ones:

For the choux pastry:

  • 8 cl  or 1/4 cup,1 tbsp and 1 tsp of milk,
  • 8 cl or 1/4 cup,1 tbsp and 1 tsp of water,
  • 1/16 tsp of salt, 2 tsp of sugar,
  • 3 1/2 Tbsp of butter,
  • 1/2 cup of flour,
  • 1 pinch of salt, 
  • 2 large eggs.
  1. In a saucepan, heat up the milk, water, salt, and sugar.
  2. Add the butter cut up in pieces.
  3. When the butter has completely melted, bring the mixture to boil.
  4. Remove the pan from the stove and add the flour by stirring very well.
  5. Place the pan back on the stove ( it must be turned off, but will still be warm), and stir and stir with a heat-resistant spatula until the dough starts becoming a ball and will no longer stick to the rims of the pan.
  6. Remove the pan from the stove, empty the dough into a cold bowl and add the eggs to the dough one at a time, mixing well after each egg.
  7. Place the dough in a pastry bag, with the large circular opening make long sticks of about 5 inches or 2 inches for small ones on a large silpat that you would have previously lay on a large perforated sheet.
  8. Place the perforated sheet in a warm oven of 350 and cook the eclairs for 15 minutes for the small ones or about 25 minutes for the large ones. The dough should be brown and dry on all sides. If the dough is a little bit soft, continue cooking the eclairs for 1-3 more minutes. Take them out to cool.
  9. When they are cold, or cool enough, cut the top off at about 2/3 high of the eclairs. Set aside.

Ingredients for the Pastry Cream:  

  • 325 gr or 1 1/3 cup of whole milk
  • 4 egg yolks,  
  • 65 gr or 4.5 tbsp of sugar,
  • 15 gr. or 3 tsp of flour,
  • 15 gr. or 3 tsp of corn starch,
  • a pinch of salt,
  • 200 gr. of bittersweet chocolate chips ( Ghiradhelli Preferably)
  • 80 gr. of butter
  1. In  large bowl, beat the egg yolks with the sugar until the mixture becomes whitish.
  2. Add the flour and the corn starch to the eggs and mix.
  3. Warm up the milk over the stove, or in the microwave for 2 minutes,
  4. Pour the hot milk into the egg mixture and stir. Place the milk/ egg mixture back onto the stove and cook until the mixture is bubbling and is becoming really thick. Remove the pastry cream from the stove, and place it into a bowl. Set aside.
  5. Pour the pastry cream in the flexipan.
  6. Cover the pastry cream with some plastic wrap and place it into the fridge to cool.
  7. Place the chocolate chips and the butter into a microwable bowl and microwave for 2 minutes or until the chocolate is completely melted.
  8. With a small whisk, mix the butter and the chocolate until you have a homogeneous mixture.
  9. Pour this mixture into the bowl.
  10. Pour the pastry cream into the same bowl, mix well.
  11. Pour this mixture into a pastry bag and fill each eclairs as shown below.

photo

Now let’s prepare the ganache for the glacage of the eclairs. This recipe yields more than you will need but you can freeze the rest for later use.

Ganache:

  • 100 gr. of chocolate chips
  • 100 gr. of heavy cream
  • 40 gr. of butter
  • 32 gr. of honey
  1. Place the chocolate and the butter in a large bowl.
  2. Pour the cream and the honey in a microwable container and cook for 2 minutes.
  3. Pour the cream over the chocolate and butter and mix well until the chocolate and butter have become a smooth ganache. If the chocolate is not completely melted, place the bowl over a pan of simmering water and stir until the chocolate is completely melted and free of lumps.
  4. Take each top and dip them into the ganache.
  5. Place each top on the roulpat in case of any drippings and leave them there until the ganache is cured.
  6. Place the top on each eclairs.

Et voila!!!

photo

Bon Appetit and Happy Cooking!!!